
With a flatbed scanner you can scan image by image or a selection of images in a batch.
Understanding Frames in SilverFast #
SilverFast is based on the use of frames. Each frame represents a single image and is going to be stored in a separate file.
- Active Frame (Red): The frame you are currently working on. All settings and adjustments apply only to this active frame.
- Inactive Frames (White): Other frames in the preview that are queued for scanning but are not currently selected.
Step 1: Choose Your Basic Settings and Run a Preview #
To scan a batch of slides, make these basic selections in the software first:
- Select Transparency
- Select Positive (or Negative)
- Select the color depth to 48 > 24 bit
- Click Preview to run a low-resolution overview scan
Note: For negatives, choose Negative instead of Positive. Additionally, some Epson scanners require selecting Transparency: Film when scanning film using the manufacturer’s film holders.
Step 2: Configure Your Active (Red) Frame #
Before generating multiple frames, select your single active frame and apply your desired settings. This will serve as your “master” frame. Adjust the following parameters:
- File Name & Destination Path
- Resolution (typically 1800 or 2400 ppi for slides/film)
- Automatic Optimizations: Turn on tools like USM (Unsharp Masking), iSRD(infrared dust and scratch removal), Auto-CCR (Color Cast Removal), and optionally Multi-Exposure (ME).
These functions work automatically without requiring manual correction.
Step 3: Automatically Detect and Duplicate Frames #
Once your active frame is configured, you can automatically find the other frames on your scanner bed.
- Go to the top menu and click on Frames > Find Frames.
- Select your specific holder, such as Slide 35x23mm Holder (or 35mm Film Holder for film strips).
All newly created frames will automatically inherit the settings (resolution, iSRD, Auto-CCR, etc.) of your original red frame. If needed, you can click on any individual white frame to make it red and apply custom adjustments to that specific image.
Step 4: Open the Batch Scan Menu #
To begin the batch process:
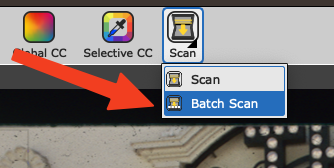
- Look for the Batch Scan button in the horizontal bar above the preview window.
- If the button is currently labeled Scan, click and hold (long-click) the button to open the dropdown menu, then select Batch Scan.
- Clicking this button will open the Export dialog.
⚠️ Important: Avoid Overwriting Your Frame Settings #
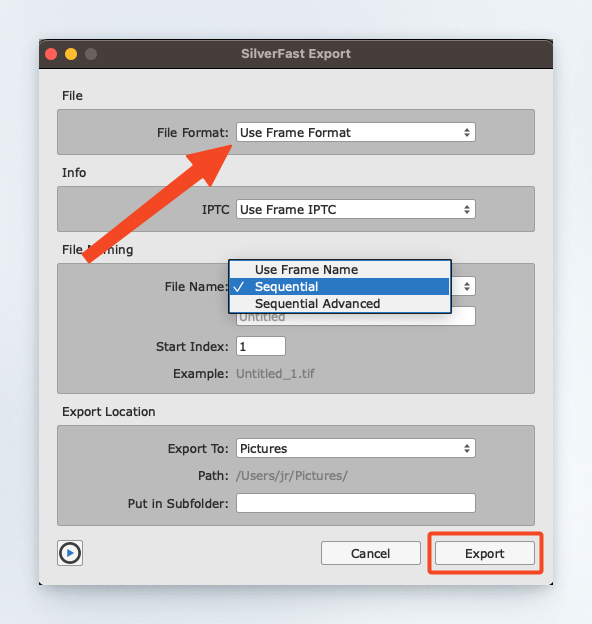
Please pay close attention to the Export dialog.
By default, settings in this dialog can overwrite the individual settings you just customized for your frames. To prevent this, ensure you select “Use frame format” and leave the corresponding settings unchecked.
You can safely use this dialog to manage:
- The base file name
- The destination save folder
- The automatic sequential numbering index
Step 5: Export and Save Your Images #
Once you are satisfied with the settings in the Export dialog, click the Exportbutton. SilverFast will automatically scan the images in a batch and save each individual frame as its own high-quality file.


